Saturday, January 23, 2016

Lower Cabinets


So, after several days of painting and flipping, painting and flipping, the lower cabinet doors and drawer fronts were all completed.  Mr. Alex was kind enough to put a few of each up as they finished to help encourage my progress and get the space back into working shape.
To paint the doors, we used Sherwin Williams Multi-Purpose Primer, and as a rule allow a minimum of four hours between coats.  We picked up two sets of Hyde painter’s pyramids (Amazon link is an affiliate), for up to five doors or a combination of doors and drawer fronts at once.  They allow you to paint, maybe get a drink of water, and flip without waiting to dry the full amount of time and we highly, highly recommend them for two-sided painting jobs.  I followed with two coats of Sherwin Williams Emerald Semi Gloss in Extra White, which we over purchased in our last place for a built-in update.  This is my new favorite brush for small-handed folks, and I used a small roller as well.
The doors were just not living up to their full potential before, and some simple updates were definitely worth it in the long run.  We’d considered the option of purchasing new doors or altering our existing ones to include glass panes, but felt that this early project could be done inexpensively and we could see where this left us.

When reinstalling the doors, we chose to add soft-closing hardware to the frames.  Our cabinets were new enough to have Euro hinges, but slammed OFTEN and this has already been a worthwhile endeavor for our time.  I found a package of 25 soft-close adapters on Amazon for $75, which will handle all of our kitchen cabinets.  We were also unhappy with the hardware, which included small knobs on the drawers and was left off of some doors, so chose to update that as well while we were at it.  On a Home Depot run, we narrowed our preferences to modern pull shapes, and confirmed that we had enough steel/nickel and didn’t like brass.  Unfortunately, nothing in store was viable pricewise and I took to the internet.  After sifting through, I chose something similar to what Alex and I had seen and ordered enough to cover all drawers and cabinets, three sets of 10 for about $75 as well. 


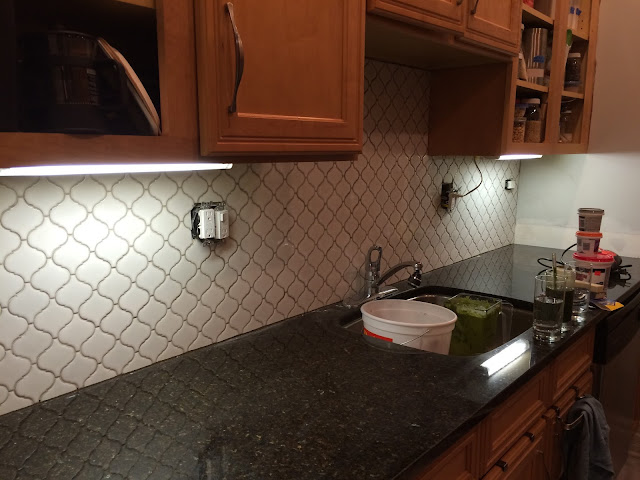
So far, we're pleased with the cabinets in relation to the countertop, wall color, appliances, and near the white backsplash.  The room feels much lighter and bigger, and we're happy with the results thus far.

Saturday, January 9, 2016

Cabinets....forever...

Our cabinets are perfectly good maple, stained lightly, but they are pretty grubby from the previous owner, sloppy flipping painters, and a summer of crazy canning lady.   We became huge fans of Sherwin Williams in our last apartment (as we repainted several rooms and many pieces of furniture) and had decided to use some white enamel trim paint for the cabinets as a starting point.  One coat of primer would give a good visual representation, and then several more coats of paint and possibly poly to protect from, you know, kitchen.
Several of our family members and friends have recently redone their kitchens and we think their dark and stained cabinets are beautiful, but for our cavelike galley situation, we felt a light color was best.  We didn’t know how well finishes like chalk paint, stain over the existing treatment, etc would hold up and we were familiar with how this exact paint held up on a built-in hutch in our apartment over the past year.  We don’t necessarily love white on white on white, especially in a kitchen, but the hope was that there should be enough contrast from the backsplash and countertop that the space just looks clean and open.


While Alex was in Austin, I pulled out my magical bin of sanding supplies from the hoodoo room to survey what we had.  Approximately everything; no additional supplies were purchased for this, which is how I know I have a refinishing problem.

We took down the rest of the doors and emptied out the cabinets we planned to reconfigure, then Alex covered the rest of the cabinets to minimize dust in them.  I removed all of the hinges and hardware from the doors, and patched the holes where the existing handles had been attached.  We looked for ones that fit the holes, but couldn’t find anything we liked and really wanted to keep the project moving, so decided puttying and painting would take the trouble out of it.  I found a putty from Elmer's Glue that went on pink and turned white when dry, but basically by the time I got through everything the first pieces were dry enough to sand.

We cleared out the living room and I laid down a huge dropcloth, from our many roommate days when we did things like cover furniture with dropcloths, and got going with my dear little sander.  I bought this thing in 2006, when I thought stripping an overvarnished table would be like no big and doable in a weekend.  The sander was a good purchase, though, because it’s gotten me through several dressers, some building projects, tons of craigslist finds, and now, our cabinets.  We decided to start by sanding with 80 grit to strip and then 120 to smooth, and to do some light sanding in between to lessen the amount of brush stroke appearance on flat surfaces.
I did the twenty doors (not sure why I thought this was a good idea?!) and seven drawer fronts (two under the sink will become tipouts) over a couple of nights, while Alex did the cabinet frames and removed old shelves etc in the kitchen.  One coat of primer seemed to work for him, and two coats of enamel.  It looks goooood, like really good, in there and the doors are coming along.  Well, really they’re taking forever because of the whole two-sided thing. But I am trying and not just watching Netflix in the guest room, promise.

Tuesday, January 5, 2016

Paint!

One of the other components of this project is painting the untiled walls, so this seemed like a good time to start.  We chose a combo paint and primer as the walls were already covered and a light color.  Honestly, if the paint weren’t of such poor quality and effort in here, we might not be working on the kitchen at all, so thanks flippers!
We’ve used Behr before and really enjoyed its coverage and durability.  When prepping for the tile, I scrubbed down as much wall as I could easily without getting too crazy. We have open shelving above our cabinets and it’s a stand-on-the-counter kind of situation for me to work up there, so cleaning is super fun.  I also opted to remove the outermost cabinet doors to be able to reach the entire wall.   We’re going to be revamping the cabinets as well, so this isn’t an excessive step to get it done right.  I’d recently cleaned behind the fridge (a super scary Halloween for sure, this year) so just had to pull it out and give a quick once-over to the wall.  Yes, the kitchen is a barely usable disaster, so let’s just let it go the whole way, ok?  The dishwasher stays so I don’t even care.  

While hanging out on the counter to clean the walls above the cabinets, I realized the ceiling was badly painted and that there was even wall paint on the ceiling.  I pulled out the surrounds for the can lights and realized they’d not bothered to do that, so we took it as a sign we were supposed to repaint the ceiling while we were at it.  This made me very cranky, but at least we had ceiling paint onhand from a redo in our previous apartment. It made me so cranky, in fact, that Alex banged it out because he is almost a foot taller and therefore can reach and fit more patience in than me. 
I turned around one day and he was also plowing through the wall painting.  I had been bumming about the holidays this year, and he seemed to know that getting this space going would really cheer me up.  With the exception of one night where I helped at my height, he did most of the paint over a weekend.  We chose this blue together and really liked it, but when it went up on the walls, whoa was that a lot.  We felt less color-shocked once things started to come back in for me to bake a bit for the holiday, and now it’s fine.  Apparently even I can be overwhelmed by color.


After the grout had cured properly, Alex took to the joints with sealer to prevent damage to all of our hard work.  He was extremely careful and used a small brush and wiped up drips well, because they can leave a white residue on tile surfaces.  As always, Nyobi helped.

Sunday, January 3, 2016

Grouting and caulking

The mortar required 24-72 hours of setting time before grouting, so we took some down time midweek.  We chose a non-white grout for less obvious maintenance.  Because our building is aging like a fine wine and located near the original lakefront (see: Lincoln Park construction) on sandy terrain, it’s important to us that the inevitable settling not ruin our hard work and require re-grouting, as in our ten year old bathtub surround.  A fantastic product on the market today is admixture, which apparently gives the grout some kind of flexibility for this situation.  For our joint size (1/16”), we actually needed unsanded grout, which is not what I purchased initially as we’d thought we’d use the preset mesh spacing, but fortunately we learned this before we started.


We purchased a mere five pounds of unsanded grout and a quart of admixture, at the Tile Shop, as well as some color-matched caulk to surround the tile.  Alex and I worked on this step together, scaling down and preparing small amounts of grout working around the kitchen.  We’d combine 20 oz of grout (by weight) with 6 oz of admixture, then mixed in a flat-bottomed bucket with a genius contraption, a large mixer that fit into the driver.  The goal was for it to reach a toothpaste consistency, then rest five minutes and mix again before spreading.

At first I was panicked, because it looked darker than it should and I wasn’t seeming to get it in the joints properly, but then Mr Awesome came along behind me with a sponge and wiped the excess off and it looked great.  As it dried it looked better.  We are super rookies but felt pretty good by the time it was finished, really too late for a school night :/


After a few days of curing, I busted out the various pastes we’d obtained and took to the problem areas.  Where the 4” backsplash had been, on the three shorter walls, I patched and sanded multiple layers with a flexible spackle, needing to build out some with mesh tape closest to the door.  After that was relatively under control, I laid some white paintable caulk between the counter and walls.  This also took several layers as I was afraid of adding too much and making a mess.  In this aisle, I’d also found caulk remover, and thought this would be a great time to remove from the sink that had broken down over the ten years since the reno, and was pleasantly surprised by the effectiveness without fumes.  We let it dry out overnight and Alex caulked the seam with a clear silicone caulk, that is supposedly antimicrobial and will last for ten years and is basically invisible here.  Alex followed up with the color-matched unsanded caulk around the tile, but we moved forward in other areas before making decisions on the trim and other finishing decisions so there's not a lot to show yet!